Backup guide summary
At the time of writing this article, the OVH datacenters that hosted my infrastructure were reduced to dust four days ago. Fortunately for me, I had a whole setup to automate my backups and I did not suffer any data loss.
When I finished restoring my servers, I still had to reconfigure my automated backup setup, and while re-reading my posts, I realized none of my articles gave a synthetic summary of how to do that. This post attempts to solve that problem.
Backup infrastructure reminder
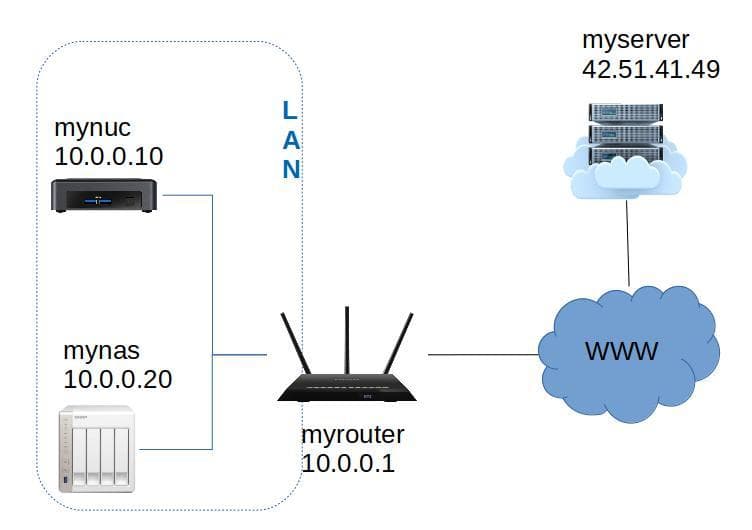
I have multiple machines on my local network and my public network. My goals are:
- To backup the important folders to my NAS located on my local network
- To backup another set of folders to a public server (in the event my NAS is caught in a fire)
- To automate all of these backups
- To be warned if an automated backup failed
To craft a solution that matches all of my criterias I decided to use restic to do my backups. Restic is a Go utility working in a client-server setup.
To automate the backups I used cron, and to be warned about failures I used healthchecks and gotify.
Finally, to backup a public server to my local NAS, I used a reverse SSH tunnel. I also had to make some specific configuration to backup files with special permissions.
All of this is explained in details in the previous blog posts that I just linked. In this article we will focus on the practical actions necessary to setup everything.
Backup a remote server
In this section we focus on how to backup a remote server to a local NAS. To illustrate the process we will use the following names:
myserver.comis the server with some precious data we'd like to backup. We are admin on this server so we can install restic or create new users if needed.mynasis our local machine that will store the backup. We have installed rest-server on this machine.mynucis a NUC on out local network.
Monitoring setup
The first thing to do is to create a monitoring job in healthchecks. This step will provide us with a token that we will put in the file healthchecks_token on the NUC.
If you need more info, check out the post about healthchecks and gotify.
Restic setup
We install the restic server on one of your local machines. In this example it is on mynas.
Then we install the restic client on our computer and we can initiate a new repository named myserver:
restic -r rest:http://mynas:12000/myserver initServer setup
myserver is the server we want to backup.
We create a user capable of performing the backups with restic:
# Create a user restic
sudo useradd -m restic
# Change its password
sudo passwd restic
# Add the restic binary to the user's home
sudo mkdir /home/restic/bin
sudo curl -L https://github.com/restic/restic/releases/download/v0.12.0/restic_0.12.0_linux_amd64.bz2 -o /home/restic/bin/restic.bz2
sudo bzip2 -d /home/restic/bin/restic.bz2 -f
# Update the permissions
sudo chown root:restic /home/restic/bin/restic
sudo chmod 750 /home/restic/bin/restic
# Give special capabilities to the binary
sudo setcap cap_dac_read_search=+ep /home/restic/bin/restic
We now have a binary capable of reading every file on the system and a user restic capable of using this binary.
Since this user will run the command to backup the files, she will need the password to the restic repository. I suggest putting it into a file rest_server_password accessible only to the user restic:
sudo su - restic
vim rest_server_password
chmod 600 rest_server_password
Backup script
To perform the backups I will use a configurable script available on my Github. This script expects a configuration file detailing:
- what files to backup
- where to backup
- where the healthchecks instance is
- where to find the password to the restic repository
- where to find the healthchecks token
In this example I assume this script is available in /scripts/backup/backup.py and config.yaml (the configuration file) and healthchecks_token (the token file) are in the same directory. I provide configuration examples on Github.
Your configuration file config.yaml should look like this:
restic:
  repository: rest:http://localhost:33333/myserver.com
  password_file: /home/restic/rest_server_password
NUC setup
On the machine that will run the cronjob (here it is mynuc) we create a user capable of establishing the reverse tunnel with the server and we create the configuration files healthchecks_token and config.yaml:
# Create the user that will ssh as restic to the server
sudo useradd -m resticremote
# Change its password
sudo passwd resticremote
# Change its shell (optional)
sudo usermod --shell /bin/zsh resticremote
# Make the configuration files accessible to the user
sudo chown :resticremote healthchecks_token
sudo chown :resticremote config.yaml
On mynuc we create a new set of keys as the user resticremote.
sudo su - resticremote
# Install oh-my-zsh (optional)
sh -c "$(curl -fsSL https://raw.github.com/ohmyzsh/ohmyzsh/master/tools/install.sh)"
# Generate keys
ssh-keygen -t ed25519
On myserver we add the newly generated public key to .ssh/authorized_keys for the user restic:
# Login as the user restic
sudo su - restic
# Create the .ssh/authorized_keys file
mkdir .ssh
touch .ssh/authorized_keys
We edit the .ssh/authorized_keys file to add the resticremote user public key. We should be able to establish a SSH connection now.
On the NUC, as the user resticremote, we try to ssh to the server:
ssh restic@myserver.comConfiguration test
At this stage, if everything works, we just need to test our backup command and then add it in our cron jobs.
# Perform the first backup as a test
python3 /scripts/backup/backup.py --config /scripts/backup/config.yaml
We should see a new snapshot on your repository now:
restic -r rest:http://mynas:12000/myserver snapshotsCronjob
If everything worked as expected, there is only one thing left to do, create the cronjob with crontab -e:
# Backup the NUC everyday at 01:30
30 01 * * * python3 /scripts/backup/backup.py --config /scripts/backup/config.yaml
That concludes the setup to backup a remote server to a local machine.
Backup between remote servers
In this setup we have a new public server backup.com, with the IP 19.19.19.19, used to store backups in the cloud.
We would like to backup myserver's data to this other server.
Backup server setup
The backup server needs to run a rest-server.
We can do this with docker and docker-compose.
We start by retrieving the image:
docker pull restic/rest-serverAnd then we create a file docker-compose.yml:
version: '2.2'
services:
  web:
    container_name: 'rest-server'
    image: 'restic/rest-server'
    restart: always
    environment:
      - OPTIONS=--append-only --private-repos
    ports:
      - 127.0.0.1:8000:8000
    volumes:
      - './data:/data'
We start the server with docker-compose up -d and create a user named "myserver" with a new password:
sudo docker exec -it rest-server create_user myserverThis password is used to access the HTTP service, this is different from the repository password.
We create a new nginx configuration to redirect traffic coming from backup.com to 127.0.0.1:8000.
In this configuration, we make sure to set client_max_body_size to a large enough value and we restrict
the access of the service to the only IP supposed to be using it with allow and deny:
server {
    index index.php index.html index.htm index.nginx-debian.html;

    server_name backup.com;
    location / {
        proxy_set_header Host $host;
        proxy_set_header X-Real-IP $remote_addr;
        proxy_set_header X-Forwarded-For $proxy_add_x_forwarded_for;
        proxy_pass http://127.0.0.1:8000;
    }

    listen 443 ssl; # managed by Certbot
    ssl_certificate /etc/letsencrypt/live/backup.com/fullchain.pem; # managed by Certbot
    ssl_certificate_key /etc/letsencrypt/live/backup.com/privkey.pem; # managed by Certbot
    include /etc/letsencrypt/options-ssl-nginx.conf; # managed by Certbot
    ssl_dhparam /etc/letsencrypt/ssl-dhparams.pem; # managed by Certbot

    client_max_body_size 4G;
    allow   42.51.41.49; # Only the IP of myserver.com is authorized
    deny    all;

}

server {
    if ($host = backup.com) {
        return 301 https://$host$request_uri;
    } # managed by Certbot

    server_name backup.com;
    listen 80;
    return 404; # managed by Certbot
}
Main server setup
On myserver, the server we want to backup, we retrieve the backup script I created:
mkdir -p /scripts
git clone https://github.com/Braincoke/backup-script /scripts/backup
Then we create the file healthchecks_token storing the check token provided in the healtchecks interface and the file rest_server_password storing the password to the repository we created. We modify the permissions of the file to allow the user restic to use them:
sudo chown :restic healthchecks_token
sudo chown :restic rest_server_password
sudo chown :restic config.yaml
sudo chmod 640 healthchecks_token rest_server_password config.yaml
sudo chown :restic backup.py
sudo chmod 750 backup.py
Then we edit the configuration config.yaml to modify the addresses of the healthcheck and restic services, and to select which folders and files to backup.
Since we added a basic http authentication, the config file should store the username and password created earlier:
restic:
  repository: rest:https://myserver:basic_auth_password_here@19.19.19.19/myserver
  password_file: /scripts/backup/rest_server_password
We can now try the setup by impersonating the user restic and starting a test backup:
sudo su - restic
python3 /scripts/backup/backup.py --config /scripts/backup/config.yaml
If everything works properly we can set a job with crontab -e:
# Backup the server everyday at 01:30
30 01 * * * python3 /scripts/backup/backup.py --config /scripts/backup/config.yaml
Conclusion
You don't know when a disaster will happen. I sure didn't expect to have to reconfigure all of my infrastructure this week-end, but I was really glad I had invested some time to design and implement a backup infrastructure. Without it, all my data would have been lost and I would have had to spend more that a few hours to put it back online.