Backup behind a NAT with reverse SSH tunneling
This article is the last of a four part series describing my current backup system:
- In the first article I explain how I use restic to perform my backups.
- In the second article I describe how I use Healthchecks and Gotify to verify that the backups run periodically.
- In the third article I show how I automate the backups, in particular when I need to read files with special permissions.
- Finally in this article I detail the process I had to follow to backup a remote server to a machine on my home local network.
One of my use cases is to backup data on some of my server to a local machine on my home network. There are multiple ways to do this, in this article I detail how I solved this issue with a SSH reverse tunnel. I also have an alternate article explaining how to achieve the same objective with a permanent port forwarding, a dyndns and a self-signed certificate.
Backup architecture
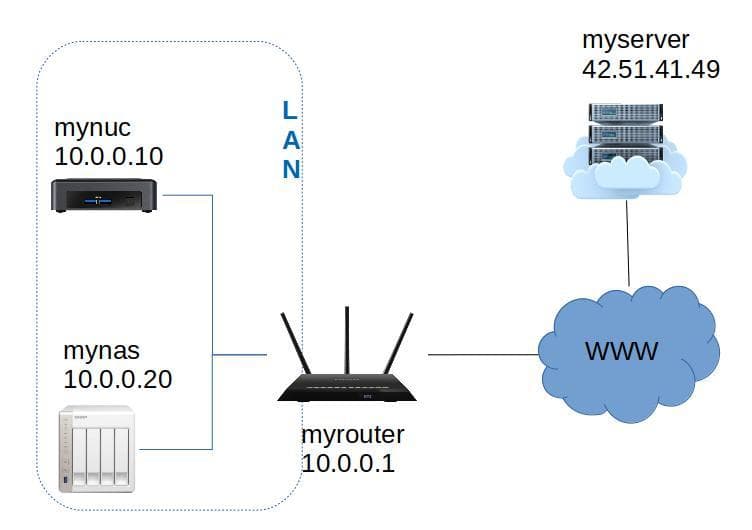
To illustrate the process I will use the following names:
myserver.comis the server with some precious data I'd like to backup. I am an admin on this server so I can install restic or create new users if needed.mynasis my local machine that will store the backup. I have installed rest-server on this machine.mynucis a NUC on my local network.myrouteris my manageable home router.
The general idea is to set up a cron job that calls the backup script shown in the previous article.
The problem is that myserver is not capable of reaching mynas because this machine is behind a NAT.
But with reverse SSH tunneling, we can work around this issue.
Here is the final command if you are too impatient to read the rest:
ssh -R 33333:10.0.0.20:12000 myserver.com "restic -p ~/password -r rest:http://myuser:mypassword@127.0.0.1:33333/CLOUD backup /etc/nginx"Reverse SSH tunneling
The usual SSH connection
When I run the command ssh myserver.com from mynuc, I establish a SSH connection between mynuc and myserver.com.
Usually we use this connection to run a shell on the remote computer (here myserver).
This is a classic SSH connection:

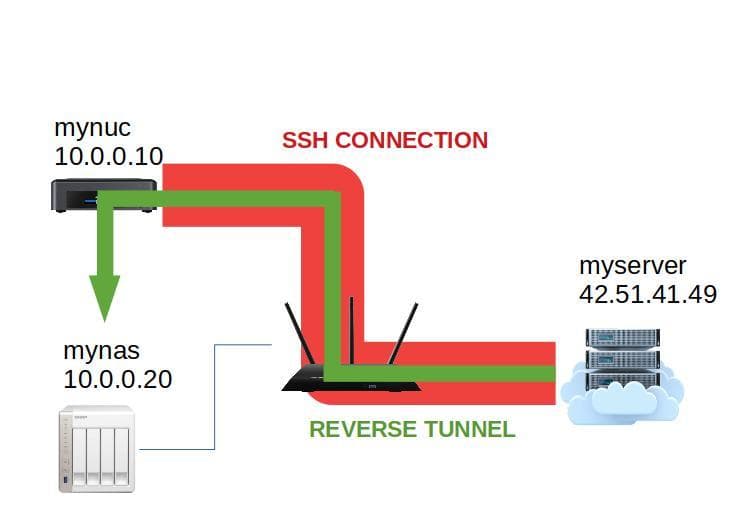
The reverse connection
With a reverse tunnel, I add a connection going the other way inside the main SSH connection.
Thanks to this new connection, myserver is able to communicate with mynuc or any other device accessible from mynuc such as mynas.
To establish a reverse connection I have to use the -R option:
ssh [-R address] [user@]hostname [command]Here is the refined documentation about the -R option:
-R [bind_address:]port:host:hostport

     Specifies that connections to the given TCP port or Unix socket on the remote (server) host (here `myserver`) are to be forwarded to the local side (**mynuc** or **mynas**).

     This works by allocating a socket to listen to either a TCP port or to a Unix socket on the remote side.  Whenever a connection is made to this port or Unix socket, the connection is forwarded over the secure channel, and a connection is made from the local machine to either an explicit destination specified by host port hostport, or
     local_socket [...].
Usage example
In my case, I want myserver to reach mynas. The issue is, the NAS operating system was botched and I can only login as an administrator with SSH. If I run the reverse tunnel command from my NAS, I am giving admin privileges to myserver.
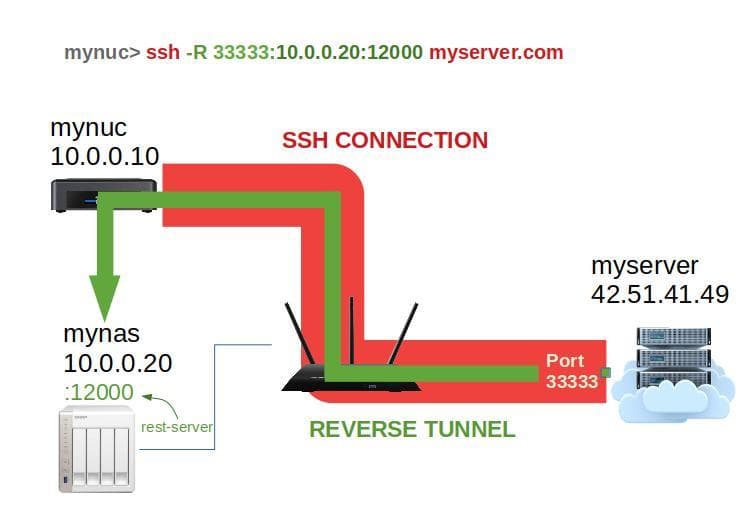
To work around this issue, I can execute the command from mynuc. Here is how to use it.
ssh -R 33333:10.0.0.20:12000 myserver.comThe above command can be translated in plain english as : "Establish a SSH connection to myserver. Then, every connection on myserver targeting the port 33333 should be redirected to mynas on port 12000".
In a nutshell, I etablished a remote port forwarding from myserver.com:33333 to mynas:12000.
In practice it can be used like this:
- On
mynuc, I run the command to establish the port forwarding. - On any device, I establish a SSH connection with the server:
ssh myserver.com. - On the newly establised SSH connection, I can now target the forwarded port:
restic -r rest:http://localhost:33333/repo.
Restic backups with reverse SSH
The steps listed previously are okay to do a backup manually, but aren't applicable to an automated backup. I can do better with one command doing everything:
ssh -R 33333:10.0.0.20:12000 myserver.com "restic -p ~/password -r rest:http://myuser:mypassword@127.0.0.1:33333/CLOUD backup /etc/nginx"I have already explained what the first part of the command does. The new part of the command starts the backup of the folder /etc/nginx to the repo named CLOUD on a rest-server located on localhost:33333. The magic of the reverse tunnel redirects this query to the rest-server located on mynas:12000.