Backup behind a NAT with port forwarding
This article is an alternative to the last step of a four part series describing my current backup system. Check out the original article here.
One of my use cases is to backup data on one of my servers to a local machine on my home network. There are multiple ways to do this, in this article I detail how I solved this issue with some port forwarding, a dyndns and a self-signed certificate. There is nothing really fancy but the process is tedious.
Backup architecture
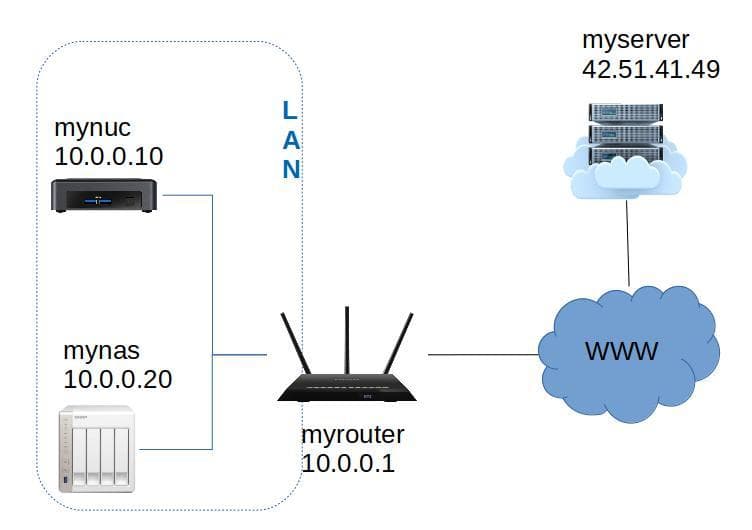
To illustrate the process I will use the following names:
myserver.comis the server with some precious data I'd like to backup. I am an admin on this server so I can install restic or create new users if needed.mynasis my local machine that will store the backup. I have installed rest-server on this machine.myrouteris my manageable home router. I can configure it to add some port forwading.
The general idea is to set up a cron job that calls the backup script shown in the this article.
The problem is that myserver is not capable of reaching mynas because this machine is behind a NAT.
But with some port forwarding, we can work around this issue.
Port forwarding
Port forwarding is configured on myrouter. This allows the redirection of incoming packets targeting a given port to a machine on the local network.
Here is an example with port forwarding configured to redirect packets targeting the port 8888 to mynas:12000.
- myserver reaches to myrouter on the port
8888. - myrouter is configured to forward packets targeting the port
8888to mynas (on the port12000). - myserver can now communicate directly with the port
12000of mynas.
You can usually restrict the port forwarding to selected incoming addresses.
DynDNS
I personnally don't have a static IP address. This means that every 3 or 4 months, my IP address might change. If it wants to communicate with mynas, myserver must reach to myrouter thanks to its public IP address. So how can I warn myserver when my public IP address has changed ?
The answer is with a dynamic DNS.
First I get a domain: mylocalnetwork.net with OVH or Online or whatever.
This domain will be translated to my public IP address thanks to the dynamic DNS.
Then I configure my domain to add a dynamic DNS. In OVH this is called DynHost.
There I add a new DynHost and create a username and a password associated with mylocalnetwork.net. Then I configure my router or another machine on my network to periodically call the OVH API with the credentials created.
The OVH server receives the request from my public IP address and can update it if it has changed.
Since OVH handles the address translation, I can always call mylocalnetwork.net and I know I will always be redirected to my public IP address.
Secure communication
Whether you decided to use Minio or rest-server as your storage solution, you will need to configure some SSL certificates to secure your communications. I know I don't want my passwords transmitted in clear in the wild. Especially passwords giving access to my backups. With rest-server I can specify the certificates to use with the following options:
--tls                  turn on TLS support
--tls-cert string      TLS certificate path
--tls-key string       TLS key path
This means that I need to create some certificates and self-sign them. This is the most tedious part.
Since I am using a dyndns I might be able to use Let's Encrypt to generate the certificates. On a QNAP there are ways to use Let's Encrypt. That being said I favor simple solutions with less maintenance and dependencies which is why I chose to self-sign the certificates.
Generating a certificate
I will use generate_cert.go to generate the certificate on a machine with Go installed.
You can follow these instructions to install go on your machine. If you choose a Go version below 1.13, the package ed25519 won't be available and you will need to install it yourself.
curl https://golang.org/src/crypto/tls/generate_cert.go\?m\=text > generate_cert.go
go run generate_cert.go --ca --host "mylocalnetwork.net,192.168.11.11"
2020/06/01 23:17:32 wrote cert.pem
2020/06/01 23:17:32 wrote key.pem
The --ca option indicates that this is a self-signed certificate.
The --host option lists the hostnames and IP to generate a certificate for.
Once run, the script creates two files, cert.pem which is my public certificate and key.pem which is my private key.
I renamed cert.pem to public.crt and key.pem to private.key.
Now I can get those files on the machine running the rest-server and give the path to the generated files to use TLS.
rest-server --listen 12000 --path /Backups --tls --tls-cert ~/certs/restic/public.crt --tls-key ~/certs/restic/private.keyInstalling the certificate on the remote server
To be able to verify the self-signed certificate, I need to upload the public certificate to the server and use it with the restic command.
To upload the certificate, I can use scp:
scp public.crt myuser@myserver:~/certsThen I have to modify my backup scripts to tell restic to verify the certificate thanks to the uploaded public.crt file.
With a self-signed certificate, or a custom CA certificate I can pass restic the certificate filename via the --cacert option.
restic -r rest:http://mylocalnetwork:8888/NUC --cacert ~/certs/public.crt checkSecurity considerations
If an attacker gains control of my remote server and manages to impersonate the user restic, he will be able to:
- read my restic passwords files
- initialize repositories on the rest-server behind my NAT
- read all of my backups
Since the attacker gained control of my server he could already read all the files on it. So the real issues here are that he is able to read the other backups and create new repositories and perform a deny of service on my NAS.
I can work around the read permissions by using a .htpasswd file to create users on the rest-server.
Minio is also able to manage multiple users.
Regarding the deny of service issue, I can limit the damage by enforcing a folder maximum size. That being said, I didn't like having my local network being accessible if my remote server was owned, so I dropped the idea. Instead I decided to use a SSH reverse tunnel to do some port forwarding only when performing the backup.