Android reverse engineering for beginners - Dexcalibur
In this post I introduce you to Dexcalibur a great tool that makes dynamic analysis reachable to beginners. This article is special since it was proof-read by Dexcalibur's developer himself! Thank you @FrenchYeti for taking this time to read this even though I know you have a million other things to do, including a new and improved version of the tool ;)
This article is the third of a series where I use the kbg messenger Android CTF to demonstrate the basics of Android reverse engineering. The KGB messenger CTF contains 3 challenges that should be solved sequentially:
- Alerts (medium) <-- we study this one
- Login (easy)
- Social Engineering (hard)
In this series, I use the first challenge Alerts to introduce you to multiple Android Reverse engineering tools. In the first post I demonstrated how to solve the challenge by decompiling the apk and patching the smali code with JADX, APKLab and apktool. In the second post, we solved the challenge using dynamic analysis with Frida.
About Dexcalibur
Dexcalibur is a NodeJS tool working on Windows, macOS and GNU/Linux that uses Frida to allow you to inject snippets of code into Android applications.
Dexcalibur makes it easy to create hooks but does much more to help you deobfuscate the code:
- it can remove
nopinstructions to make the smali code more readable. - it can remove useless
gototo simplify the bytecode. - it automatically gives understandable aliases (like
decrypt,encode) to functions that are simple wrappers. - it detects code that is dynamically loaded and adds it in the workspace for you to inspect it.
![]()
Installation process
NVM
Dexcalibur is built on NodeJS. To make sure you have the correct version, you should install nvm, a node version manager.
If you use zsh like me you can install nvm as a zsh plugin. Basically you clone the repo with git clone https://github.com/lukechilds/zsh-nvm ~/.oh-my-zsh/custom/plugins/zsh-nvm and add the plugin zsh-nvm in your .zshrc.
You can then source your .zshrc which will perform the install. You can also add the plugin nvm for the autocompletion.
If the autocompletion doesn't work, remove .zcompdump files in your home directory
Now you can run nvm and upgrade it with nvm upgrade.
NodeJS 12
The officiall Dexcalibur's documentation indicates that NodeJS 12 is necessary for the program to work.
Installing NodeJS 12 with nvm requires just one command.
nvm install v12In case you have multiple node versions installed, you can list them with nvm list then select version 12 as the default version with nvm use v12.
You can also use nvm run <node_version> app.js to run an application with a specific node version
Frida
The next requirement is Frida
Frida is a dynamic instrumentation toolkit for developers, reverse-engineers, and security researchers.
Frida is the tool Dexcalibur is using to create hooks. Usually, penetration testers use Frida directly to do their reverse engineering, and this process can be tedious. Dexcalibur gives us an easy way of reversing an Android application without the hassle of setting up the Frida scripts! Check out my previous article to get started with Frida.
Installing frida is as easy as
pip install frida-toolsI won't go into details about installing Java as it is usually already installed, use java --version to check the version you have.
Installing Dexcalibur
To install Dexcalibur you just have to run
npm install -g dexcaliburAfter a few seconds, you should now have a brand new install of Dexcalibur.
If you get an error like python not found at the end of the installation, you might need to install a tool to make python point to python3: sudo apt install python-is-python3.
Here are the steps to finish the installation:
- In your terminal, run
dexcalibur. - Visit
http://localhost:8000. - Start the configuration process. Dexcalibur comes with sane defaults but you might want to change where the workspace is saved.
- The program downloads a bunch of dependencies, then a green bar with "Success" appears.
- Kill the program with
CTRL + Cin the terminal. - Run
dexcaliburagain.
You can now visit the home page and be greeted with the interface.
Lab setup
All of our tools are installed, it is time to set up our lab composed of our phone and our test application.
adb and phone setup
You should refer to the previous article to learn how to install and use adb on your test phone.
My setup consists of an Ubuntu 18.04 machine and a Samsung Galaxy S7 (SM-G930F) with a rooted LineageOS 14.1-20180712-NIGHTLY-herolte. You could also use an emulator if you don't have an Android phone to perform your tests.
Make sure the kgb messenger application is installed on your phone. You can install it with:
adb install kgb-messenger.apkFrida server
You also need to run frida-server on the phone. You have to make sure that the major version of frida-server matches the major version of frida-node used by Dexcalibur. If you have a bash shell you can get the version used by Dexcalibur with this command:
grep version "$(dirname $NVM_BIN)/lib/node_modules/dexcalibur/node_modules/frida/package.json"

  "version": "14.2.13",
    "remote_path": "frida/frida/releases/download/{version}"
Here Dexcalibur uses the version 14.2.13 of frida-node, so on the frida releases page I download the latest frida-server with a version starting with 14, which also happens to be 14.2.13 in this case.
Once you have the correct version of frida-server, uncompress the archive and rename the server to "frida-server"
unxz frida-server-14.2.13-android-arm64.xz
mv frida-server-14.2.13-android-arm64 frida-server
Then you can install the server on the phone with adb:
adb root # might be required
adb push frida-server /data/local/tmp/
adb shell "chmod 755 /data/local/tmp/frida-server"
Next you have to start the server. This last step must be done as root:
adb shell "/data/local/tmp/frida-server &"Finally run adb devices -l to make sure the adb daemon is running.
You now have a phone with adb, the target application and frida-server installed.
We're ready to do some reversing!
Static analysis reminder
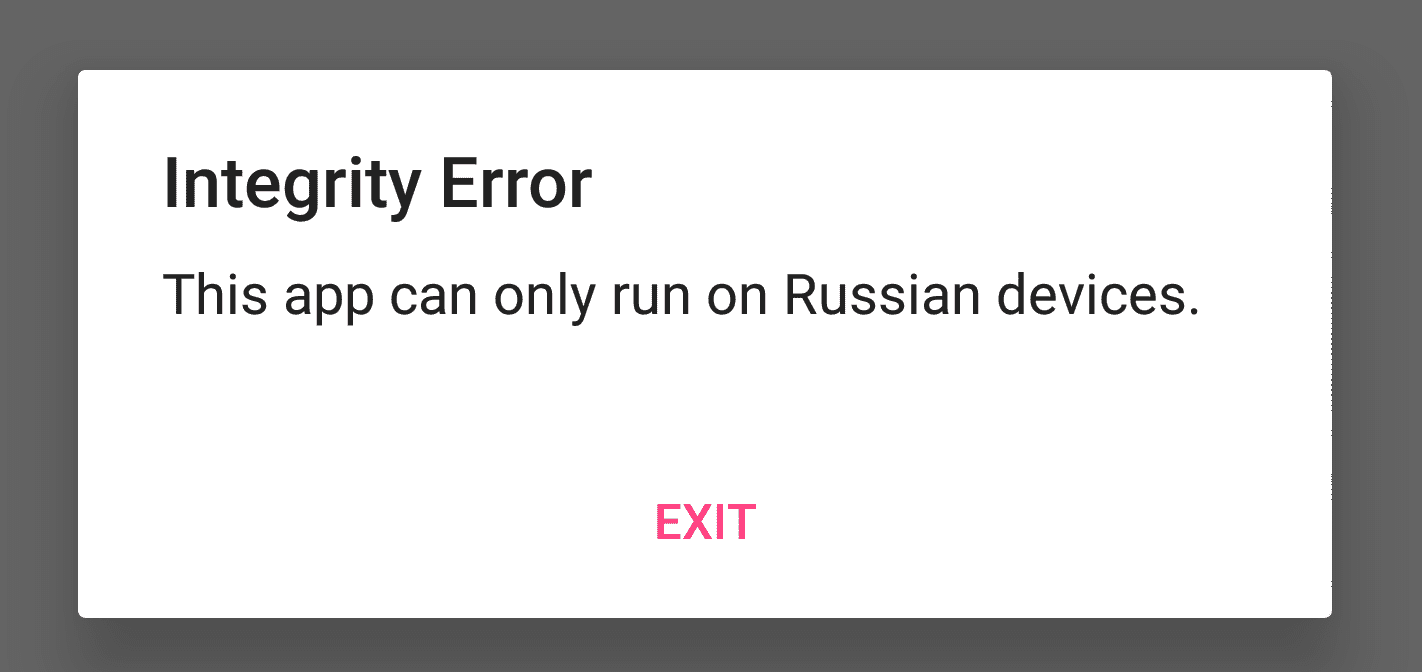
The purpose of this article is to get started with the tool, so I used a very simple application to do the demonstration. You'll find the detailed static analysis in the previous article, but as quick reminder, when we open the app, we are greeted with an error message saying:
Integrity error
This app can only run on Russian devices.
When we decompile the apk we find three activities:
- LoginActivity
- MainActivity
- MessengerActivity
The MainActivity is the one performing the checks inonCreate():
public void onCreate(Bundle bundle) {
    super.onCreate(bundle);
    setContentView((int) R.layout.activity_main);
    String property = System.getProperty("user.home");
    String str = System.getenv("USER");
    if (property == null || property.isEmpty() || !property.equals("Russia")) {
        a("Integrity Error", "This app can only run on Russian devices.");
    } else if (str == null || str.isEmpty() || !str.equals(getResources().getString(R.string.User))) {
        a("Integrity Error", "Must be on the user whitelist.");
    } else {
        a.a(this);
        startActivity(new Intent(this, LoginActivity.class));
    }
}
The app uses System.getProperty("user.home") and verifies that the result is "Russia".
Reversing with Dexcalibur
Project setup
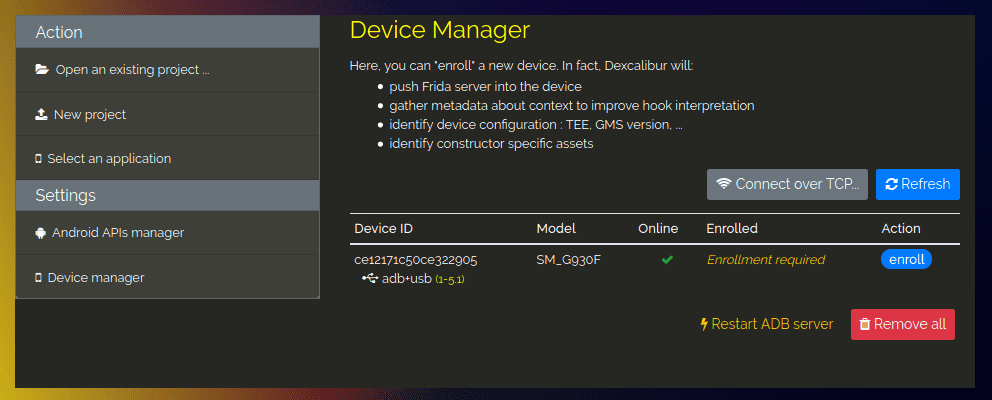
Let's start by enrolling our device in Dexcalibur. Visit http://localhost:8000 and go into the Device manager tab. There you should see your phone, if not try to disconnect and reconnect your phone and click refresh.
Click on the blue button enroll.
Next, switch to the Select an application tab and in the drop down menu choose your phone.
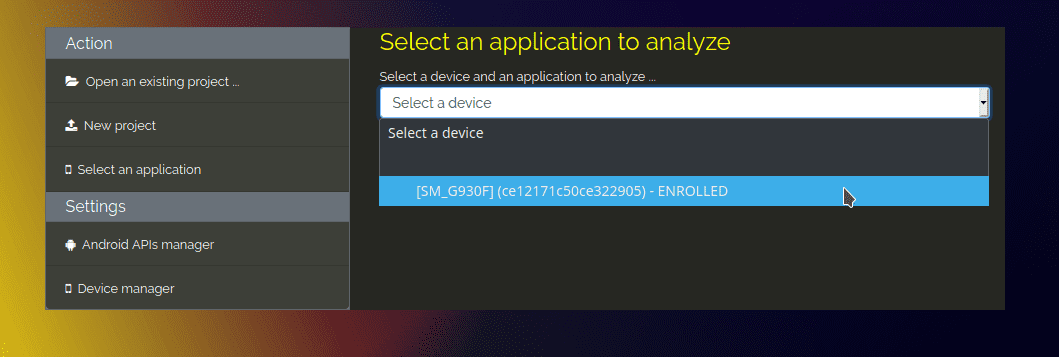
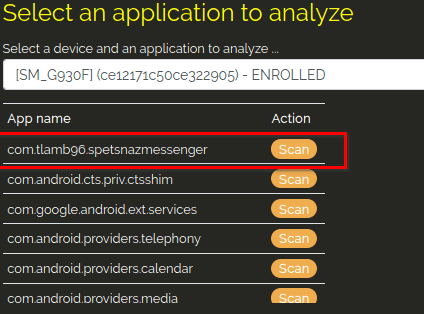
A bunch of package names should appear.
Select the application com.tlamb96.spetsnazmessenger.
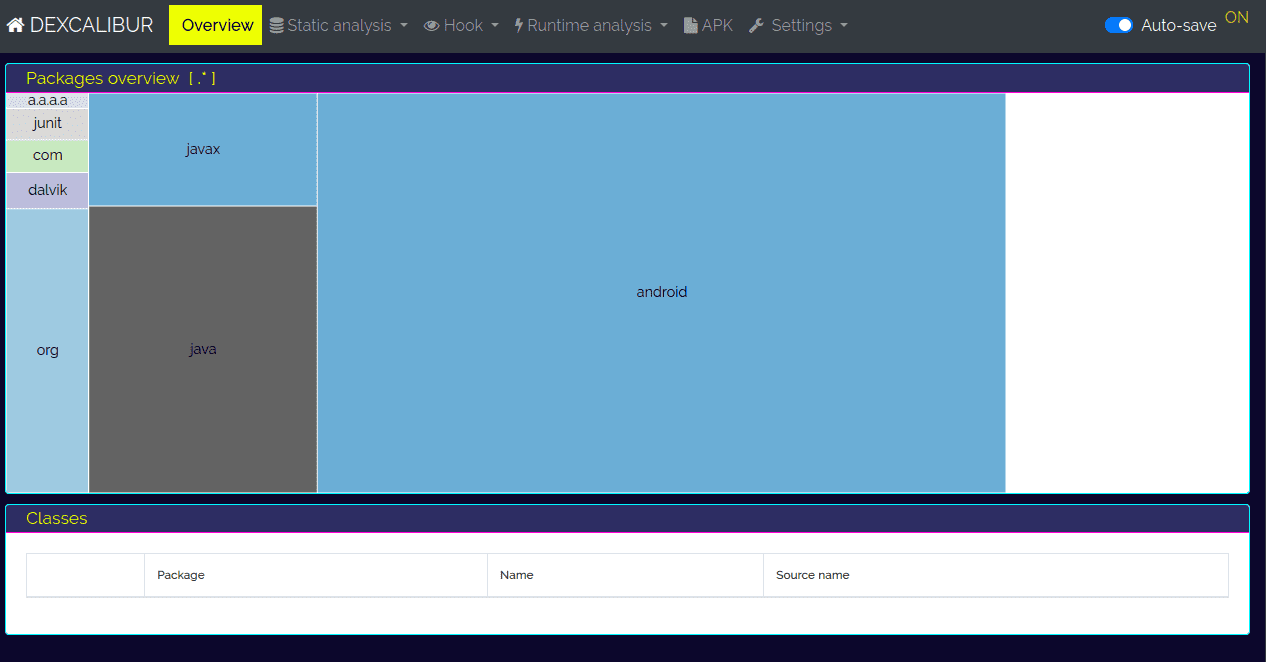
Dexcalibur will start analyzing your package. Once this process is finished, you should land on the Overview page. This page just gives you a basic overview of which packages are used in the application and how much.
Predefined hooks
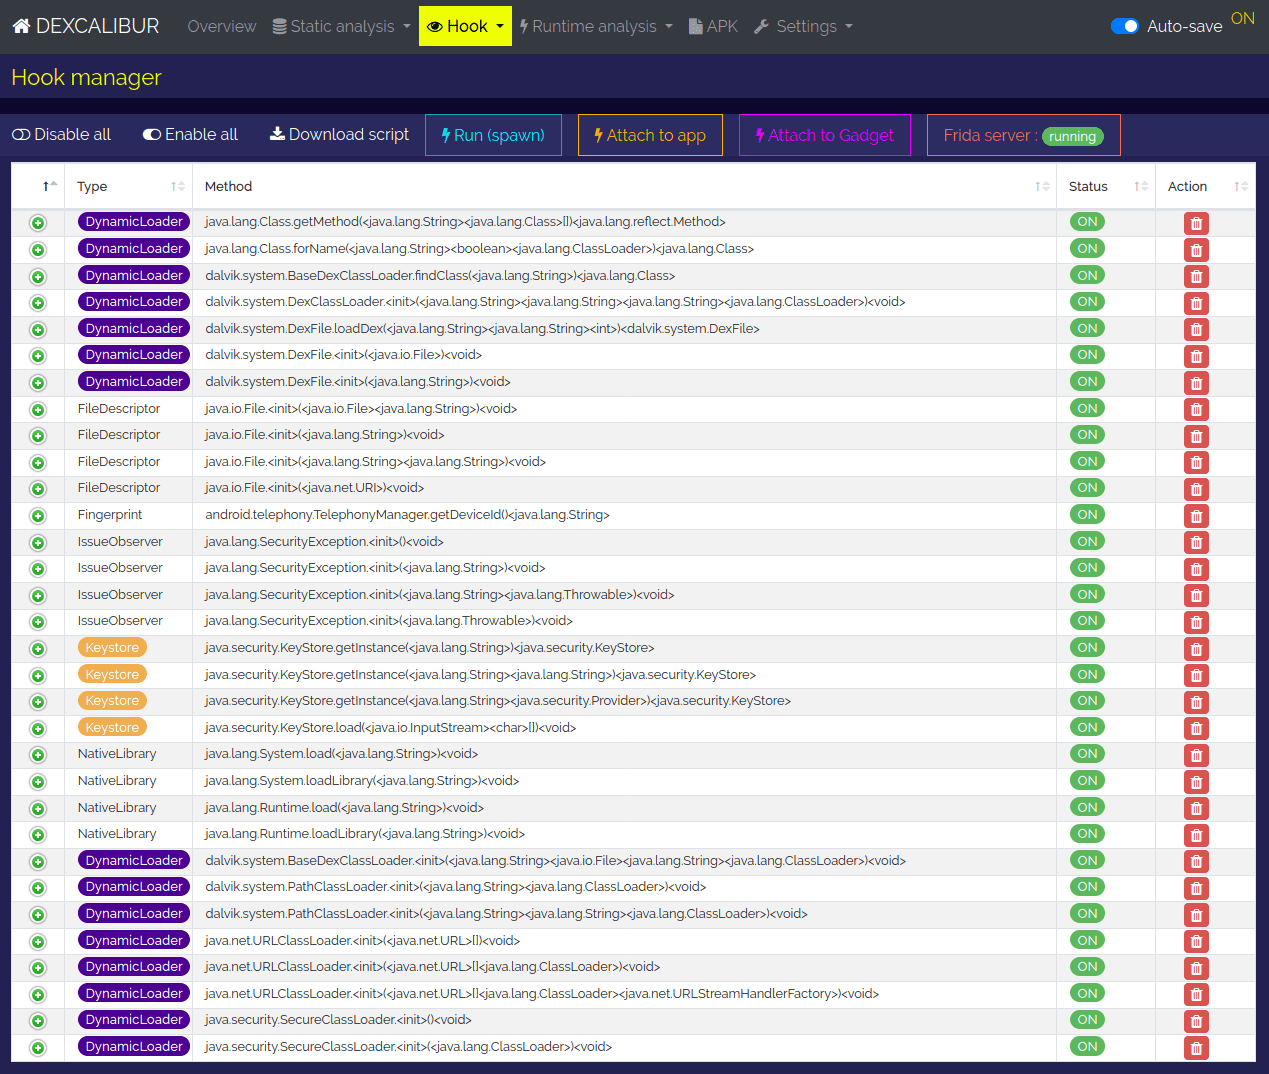
Let's move on to the Hook > Dashboard view. On this view you have the list of every hook already created by the application.
With Dexcalibur we are able to intercept calls to a function and inspect or modify the return value: that's called hooking
For instance Dexcalibur has already created the hook for java.security.KeyStore.getInstance().
Every time this method will be called, we will have a log showing us the parameters of this function and the return value.
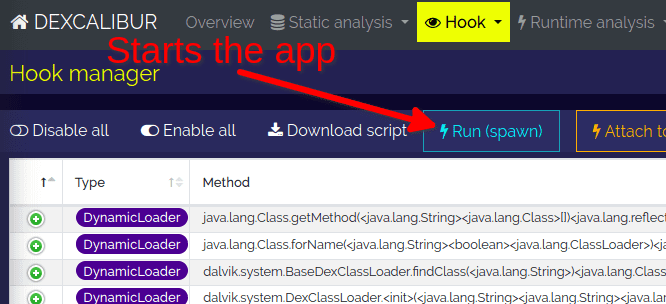
Let's try to run the application with these default hooks to see what happens.
In the dashboard, click on ⚡ Run (spawn).
The application should launch on your phone, and Dexcalibur automatically changes the view to Hooks > Logs. There you will see all the hooked methods that were called during the execution:
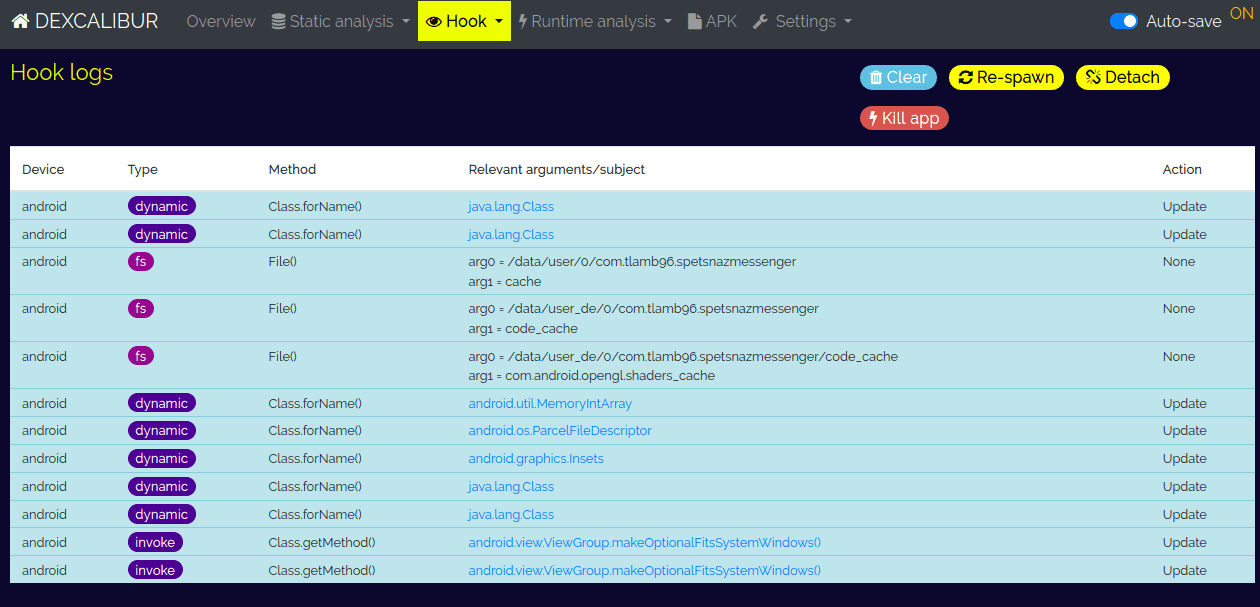
Here is an excerpt of the logs where we can see that the constructor File() was called with the arguments:
- arg0: /data/user/0/com.tlamb96.spetsnazmessenger
- arg1: cache
| Device | Type | Method | Relevant arguments/subject | Action |
|---|---|---|---|---|
| android | dynamic | Class.forName() | java.lang.Class | Update |
| android | fs | File() | arg0 = /data/user/0/com.tlamb96.spetsnazmessenger arg1 = cache | None |
| android | fs | File() | arg0 = /data/user_de/0/com.tlamb96.spetsnazmessenger arg1 = code_cache | None |
Adding new hooks
Since we have already done a static analysis of the app, we know that one of the checks looks up the property user.home with System.getProperty to verify that the result is "Russia".
Let's hook this function to bypass the first check.
We start by going into the Static analysis > Search engine view. Dexcalibur provides a search utility with filters. You won't find a documentation about how to search with Dexcalibur at the moment, but the interface provides utilities to help you search methods and classes in the form of little pills acting like search wizards.
Here we want to hook a method called getProperty so click on the soft orange pill find method by name:
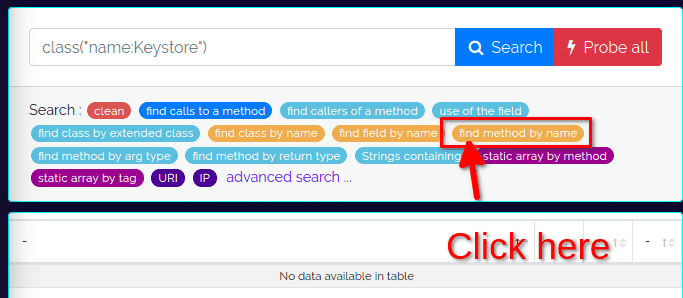
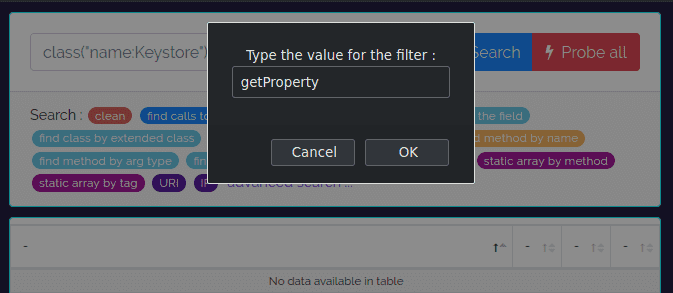
This opens a popup where you can fill in the name of the function you are looking for.
Note that you can enter a regular expression here like getProp.* for instance.
For now let's fill in getProperty.
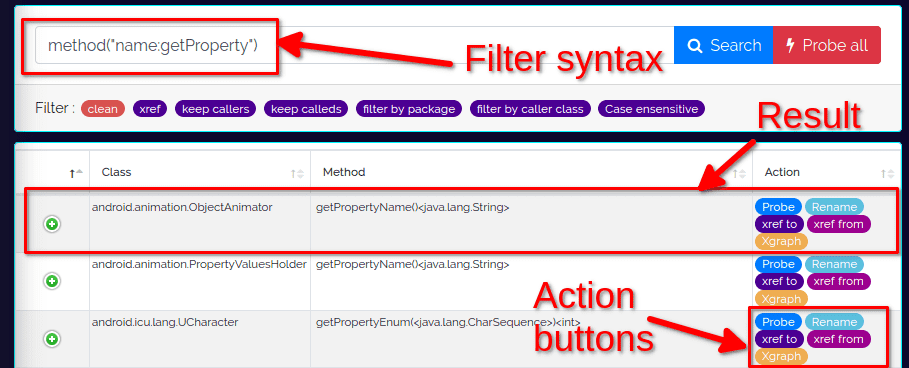
Because I have already run the Dexcalibur analysis, this gives me 31 results. Notice how Dexcalibur automatically fills in the filter syntax that you could have used manually in the search box.
I'll show you some tricks to speed up your search later. For now let's do a good old CTRL+F and search for System:
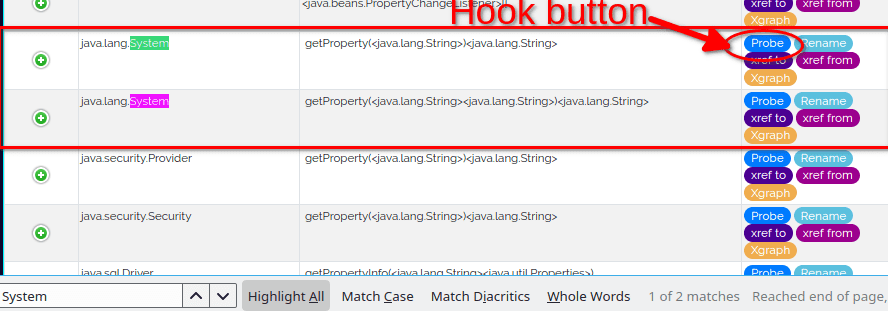
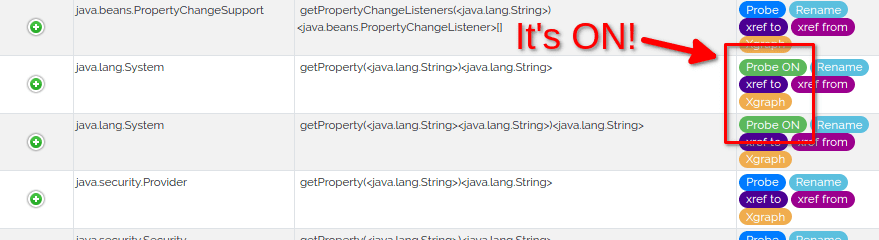
Now comes the magic, if we want to hook these functions, all we have to do is click on the blue button Probe.
Once we have done that, the button switches to green with the text Probe ON.
If we go back in the view Hook > Logs and use the 🗘 Re-spawn button, the application will restart and we will see the data that passed through our new hooks.
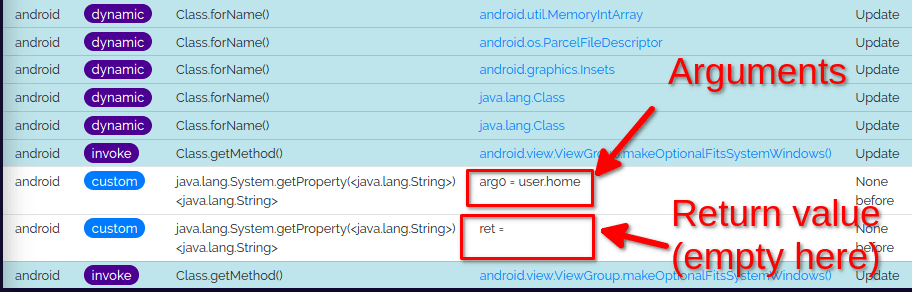
Most of the time, for each custom hook you will see two rows:
- one row listing the parameters passed to the hooked function
- one row showing the return value of the function
In this case the function java.lang.System.getProperty() was called with the argument user.home (as expected) and returned an empty string.
That's all you need to do to create a new hook.
Customising hooks
We managed to hook System.getProperty to display its parameters and its return value.
What if we wanted to modify the return value so that it always returns "Russia"?
To do so, let's go back to the view Hook > Dashboard. You will see that our new hooks are listed at the bottom as custom.
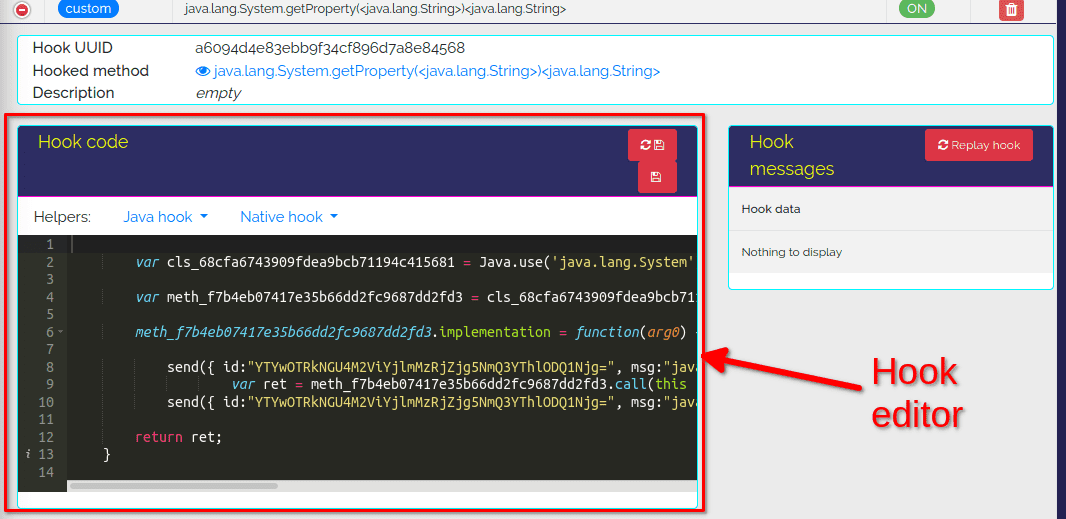
In the first column, you will find a green + button that you can click. This will open an editor where we can customise our hook.

Let's pause for a second here.
Dexcalibur is built on top of Frida, a tool allowing us to inject QuickJS code into processes. Your JS gets executed with full access to memory, hooking functions and even calling native functions inside the process. There’s also a bi-directional communication channel that is used to talk between your app and the JS running inside the target process.
The editor you see allows you to modify this JS code. If you'd like to learn more about Frida, check out my previous article.
Our modification is simple enough, we want the return value to always be "Russia". Replace
return ret;With
return "Russia";Then click on "Save change" (the button without the refresh icon).
Now go back on the Hook > Logs view and click on 🗘Respawn.
The application loads with a new error message:
Must be on the user whitelist
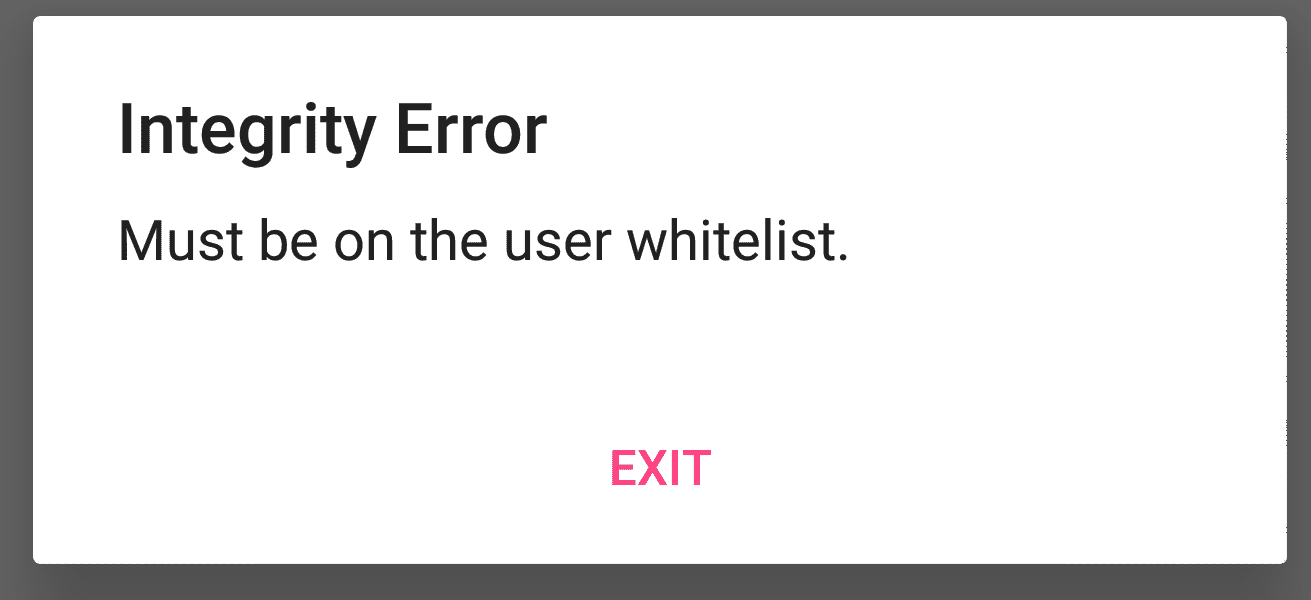
Yay for us! We used Dexcalibur to bypass a control check!
The hook logs still list the return value ret as empty. This is normal, we didn't modify the data sent back to the logs.
Customising the log data
As stated before, Frida offers a bi-directional communication channel used to talk between your app and the JS running inside the target process. Dexcalibur uses this channel to send log data with the function send:
send({
  id:"YTYwOTRkNGU4M2ViYjlmMzRjZjg5NmQ3YThlODQ1Njg",
  msg:"java.lang.System.getProperty(<java.lang.String>)<java.lang.String>",
  data:{arg0:arg0,},
  action:"None before",
  after:false
});
var ret = meth_f7b4eb07417e35b66dd2fc9687dd2fd3.call(this , arg0);
send({
  id:"YTYwOTRkNGU4M2ViYjlmMzRjZjg5NmQ3YThlODQ1Njg",
  msg:"java.lang.System.getProperty(<java.lang.String>)<java.lang.String>",
  data:{ret:ret},
  action:"None before",
  after:true
});
If you wish to send back additional data, the creator of Dexcalibur recommends to reuse the existing send functions and update the data attribute with your additional information.
Dexcalibur uses the id to map to hook result to the targeted method and give you a rich log display. That's why you should always reuse the existing send methods when possible.
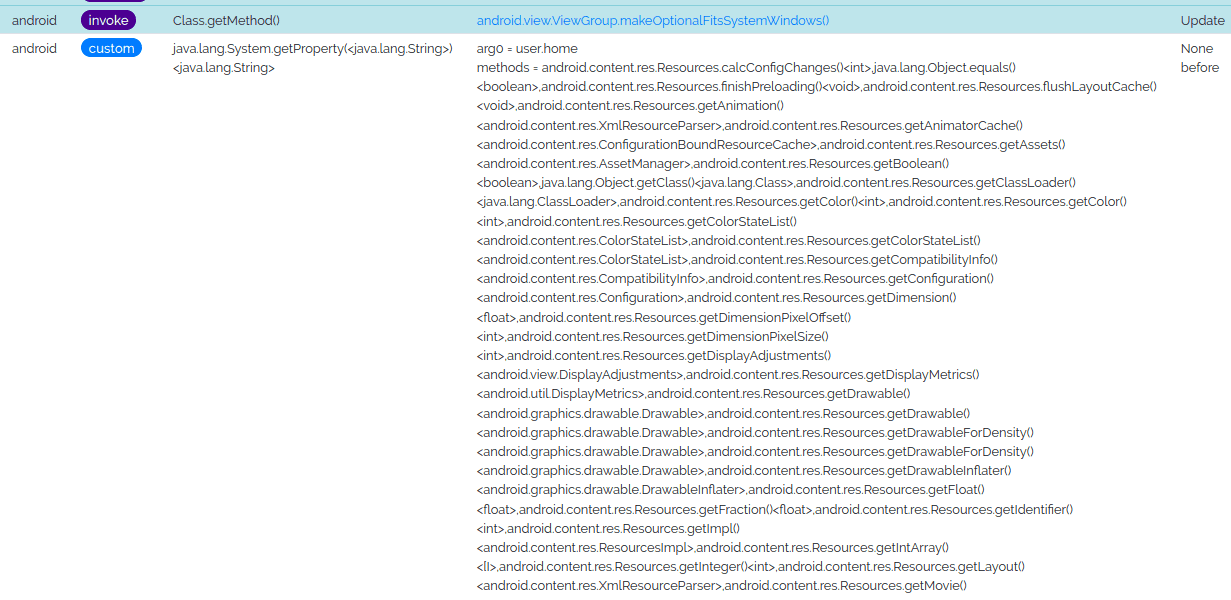
I didn't have a relevant example in mind so I just decided to list all the methods of the class Resources and show them in the logs. Here is the modified hook of getProperty, I added comments delimiting the added code to make it easier to read:
var cls_68cfa6743909fdea9bcb71194c415681 = Java.use('java.lang.System');

var meth_f7b4eb07417e35b66dd2fc9687dd2fd3 = cls_68cfa6743909fdea9bcb71194c415681.getProperty.overload('java.lang.String');

meth_f7b4eb07417e35b66dd2fc9687dd2fd3.implementation = function(arg0) {

    // -----------------START ADDITIONAL CODE -------------------------------
    // We retrieve all the methods of the class Resources as a string array
    const Resources = Java.use("android.content.res.Resources");
    const methods = Resources.class.getMethods().map(function(m){
        return m.toString();

    });
    // -----------------END ADDITIONAL CODE ---------------------------------
    send({
      id:"YTYwOTRkNGU4M2ViYjlmMzRjZjg5NmQ3YThlODQ1Njg=",
      msg:"java.lang.System.getProperty(<java.lang.String>)<java.lang.String>",
      // -----------------START ADDITIONAL CODE -----------------------------
      // Here we add the object "methods"
      data:{arg0:arg0,methods:methods},
      // -----------------END ADDITIONAL CODE -------------------------------
      action:"None before", after:false
    });
    var ret = meth_f7b4eb07417e35b66dd2fc9687dd2fd3.call(this , arg0);
    send({
      id:"YTYwOTRkNGU4M2ViYjlmMzRjZjg5NmQ3YThlODQ1Njg=",
      msg:"java.lang.System.getProperty(<java.lang.String>)<java.lang.String>",
      data:{ret:ret},
      action:"None before",
      after:true
    });
    return "Russia";
}
The result is a big list of methods in the logs.
Search tips
Earlier, when we wanted to hook System.getProperty we used the search function in the view Static analysis > Search engine. In this section I will list some additional tips to search a function.
Search by signature
In our case we knew exactly the signature of your function: java.lang.System.getProperty.
We can search by signature with the filter method("__signature__:<signature_here_as_regex>).
method("__signature__:java\.lang\.System\.getProperty")Filter by enclosing class
Initially we searched for all methods named getProperty with method("name:getProperty").
We can add another filter to select methods whose enclosing class is named System:
method("name:getProperty").filter("enclosingClass.name:System")We can use the same logic and select all methods named "getProperty" whose enclosing class are in the package lang:
method("name:getProperty").filter("enclosingClass.package.name:lang")Conclusion
The kgb-messenger app is easy to decompile and reverse, and as such, using Dexcalibur to solve this kind of challenge is obviously an overkill. The purpose of this article was to introduce you to the tool and the concepts of dynamic analysis. Even though we mostly relied on static analysis to solve the challenge, you should now have the basics to use Dexcalibur and perform dynamic analyses on obfuscated applications.