Android reverse engineering for beginners - Decompiling and patching
In this post I gradually build knowledge and show you how to decompile an application with JADX and how to patch an application automaticallly with APKLab. I end the article by showing you how to patch and app manually with apktool, keytool and jarsigner.
This article is the first of a series where I use the kbg messenger Android CTF to demonstrate the basics of Android reverse engineering. The KGB messenger CTF contains 3 challenges that should be solved sequentially:
- Alerts (medium) <-- we study this one
- Login (easy)
- Social Engineering (hard)
In this serie, I use the first challenge Alerts to introduce you to multiple Android Reverse engineering tools. In this post, I focus on the setup and solving the challenge with the basics of reverse engineering: decompiling and patching.
Lab setup
In this section I describe how to create your test lab with an old phone.
My setup consists of an Ubuntu 18.04 machine and a Samsung Galaxy S7 (SM-G930F) with a rooted LineageOS 14.1-20180712-NIGHTLY-herolte. You could also use an emulator if you don't have an Android phone to perform your tests.
In this order, you should install adb on your host, enable USB debugging on your phone and install the challenge on the phone.
Install adb
Android Debug Bridge (adb) is a versatile command-line tool that lets you communicate with a device. Things you can do with adb:
- install and debug applications
- upload and download files
- get a unix shell on the device
- get info on the device
For more information about adb checkout this documentation.
sudo apt-get install android-tools-adbEnable USB debugging
To use adb with a device connected over USB, you must enable USB debugging in the device system settings, under Developer options.
To activate the developer options you have to go into Settings > About phone and click a bunch of times on the build number. Once you have done that the developer options will appear in the settings.
You can now connect your phone to your computer via USB and run adb devices -l. You should now see your device connected:
adb devices -l
List of devices attached
ce12171c50ce322905     device usb:1-5.1 product:lineage_herolte model:   device:herolte transport_id:1
Using adb
You can do many things with adb, here I'll list a few interesting things to get you started.
You can install an apk with adb install <path_to_apk>.
You can open a shell on the device with adb shell:
adb shell
herolte:/ $ ls storage/
Private  emulated  self
You can list installed packages in a shell with pm list packages -f.
And you can pass this as a one time command with adb shell 'pm list packages -f'.
adb shell 'pm list packages -f'
package:/system/priv-app/CtsShimPrivPrebuilt/CtsShimPrivPrebuilt.apk=com.android.cts.priv.ctsshim
package:/system/priv-app/GoogleExtServices/GoogleExtServices.apk=com.google.android.ext.services
package:/system/priv-app/TelephonyProvider/TelephonyProvider.apk=com.android.providers.telephony
You can start an application from its package name with am start <package_name>. For example:
adb shell am start com.android.calendarHere I have only one phone connected. When you have many phones, select which one to use with the option -s <serial_number>.
You can download files with adb pull remote local and upload files with adb push local remote.
Installing the application
Download the application and install it with the adb install command:
adb install kgb-messenger.apk
Success
You can now run the app on your phone to check that it is properly installed.
Decompiling with JADX
Decompilation
When we open the app, we are greeted with an error message saying:
Integrity error
This app can only run on Russian devices.
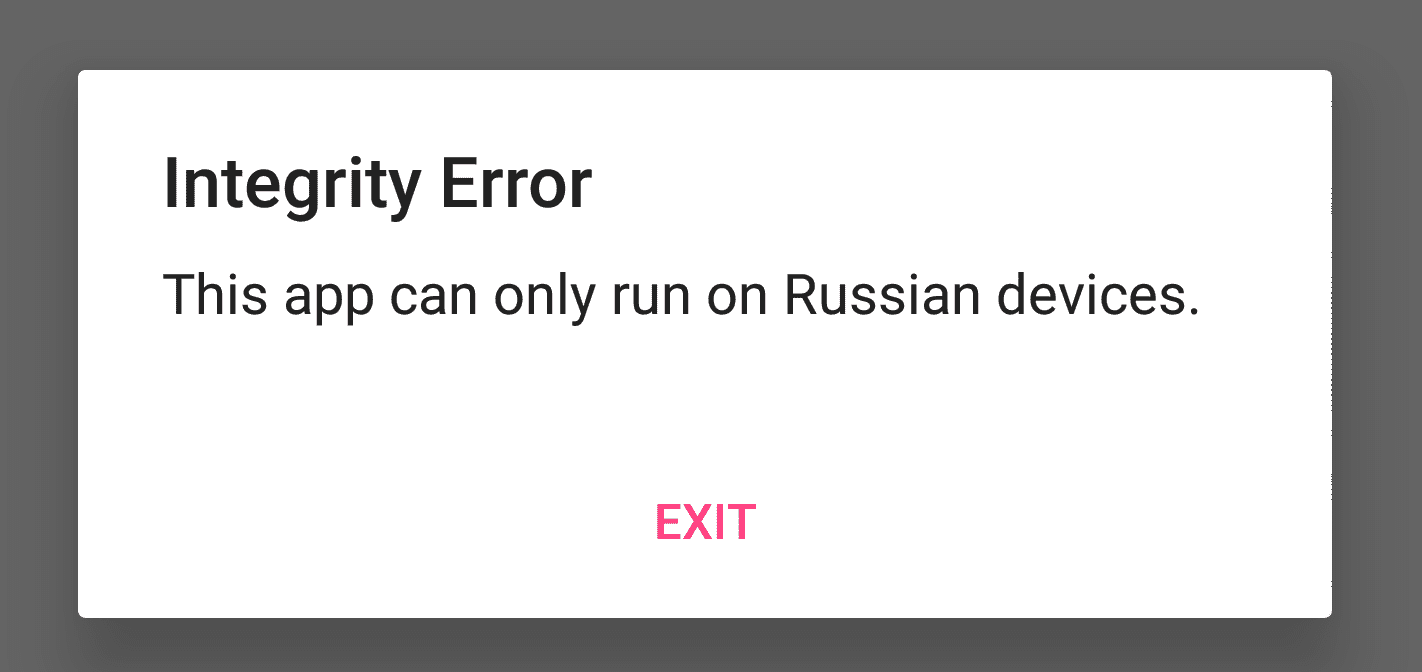
I took this screenshot with adb shell screencap /sdcard/Pictures/russian_only.png
If you try to change your language to Russian, this won't work. So what is happening? How does this application checks that we are on a Russian device? To answer these questions I'll use jadx, a decompiler capable of producing Java code from an APK.
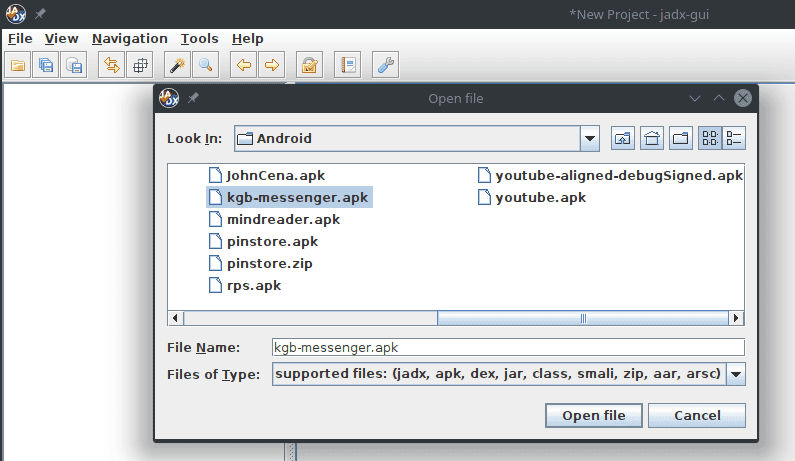
If you haven't got it on your system yet, I'll let you follow the installation process then run the graphical user interface with jadx-gui. There you should select the application kgb-messenger.apk to start the decompilation process.
The decompilation process is extremely quick (the app is very light). On the left hand side we have the hierarchy of classes we can explore. For instance in this case we have three activities:
- LoginActivity
- MainActivity
- MessengerActivity

We are interested in MainActivity since this is the activity that is started.
You can check this in Resources > AndroidManifest.xml where you can see that this activity is registered as the main one:
<activity android:name="com.tlamb96.kgbmessenger.MainActivity">
    <intent-filter>
        <action android:name="android.intent.action.MAIN"/>
        <category android:name="android.intent.category.LAUNCHER"/>
    </intent-filter>
</activity>
We can select the MainActivity class on the left panel to display its contents. We can see that the code is some usual Java code that we can read without too much effort.
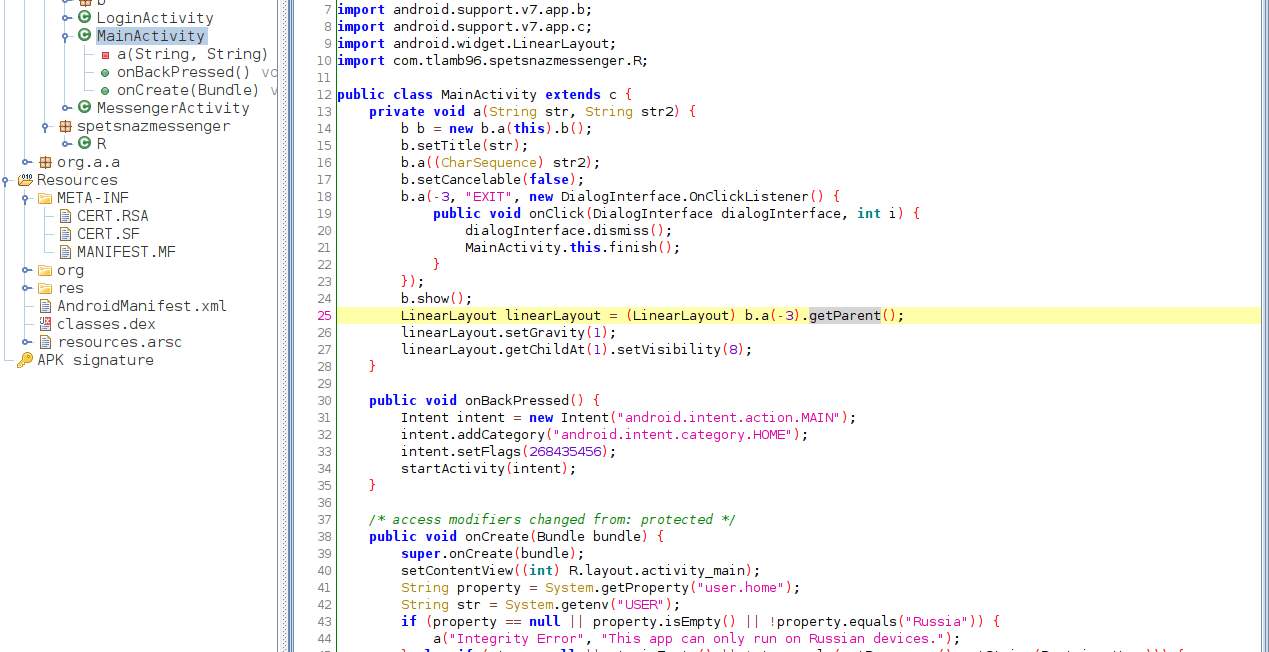
The method we're interested in is onCreate(). In this method, a check is performed, and if it fails, the message "Integrity Error, This app can only run on Russian devices." is displayed:
public void onCreate(Bundle bundle) {
    super.onCreate(bundle);
    setContentView((int) R.layout.activity_main);
    String property = System.getProperty("user.home");
    String str = System.getenv("USER");
    if (property == null || property.isEmpty() || !property.equals("Russia")) {
        a("Integrity Error", "This app can only run on Russian devices.");
    } else if (str == null || str.isEmpty() || !str.equals(getResources().getString(R.string.User))) {
        a("Integrity Error", "Must be on the user whitelist.");
    } else {
        a.a(this);
        startActivity(new Intent(this, LoginActivity.class));
    }
}
Here we can see that the application looks for the property user.home and verifies that it is equal to Russia. What is the purpose of the method System.getProperty(String key)?
To answer that we can take a look at the official android documentation.
Gets the system property indicated by the specified key.
We could have guessed that much. What's interesting is that, since we can have a root shell with adb, we can also interact with these APIs.
adb workaround
First we make sure adb is started with root permission by running adb root then we start a shell with adb shell.
We can now use the system binary /system/bin/getprop to list all or one property.
1|herolte:/ # getprop --help
usage: getprop [NAME [DEFAULT]]

Gets an Android system property, or lists them all.
Here I use getprop to list all properties (and pipe to head to reduce the output to the first 3 results):
herolte:/ # getprop | head -n 3
[af.fast_track_multiplier]: [1]
[audio_hal.force_voice_config]: [wide]
[dalvik.vm.appimageformat]: [lz4]
I can select only one property by giving its name:
herolte:/ # getprop dalvik.vm.appimageformat
lz4
Let's get back to our reverse engineering. We know the app looks at the property user.home. In my case, this is empty. Since I am able to use getprop to read properties, I can also modify them with setprop:
herolte:/ # setprop --help
usage: setprop NAME VALUE

Sets an Android system property.
So let's use this program to set our user.home property to "Russia":
herolte:/ # setprop user.home Russia
herolte:/ # getprop user.home
Russia
Now if we restart the app we will see that the message hasn't changed. Why? This is because there are two types of properties in Android:
- System wide properties that you manage with
setpropandgetpropin the shell - Process wide properties that you manage with
System.getProperty()andSystem.setProperty().
What happens is that system wide properties are read once during boot and then propagated to the applications. When we change the system wide properties after boot the applications are still using the properties that were read at boot. So in short, we cannot change these properties on the fly. In addition to that, if we change a property now in the adb shell, the change will not be persisted at reboot. The only way to persist a property across a reboot is to name it with the prefix persist, like persist.user.home. In our case this doesn't help since the application looks for the property user.home and not persist.user.home.
One viable option would be to put your phone in recovery mode, mount the /system partition and modify /system/build.prop to add the property user.home with the value "Russia". That said, I haven't tested this.
This section did not help us solve the challenge but I kept it because it contained valuable information and showed that you will rarely find the solution on the first try
Patching with VSCode and APKLab
Since we can't modify the data read by the code, we will modify the code itself to bypass the control checks, that's called patching.
JADX offers an option to save the decompiled Java code as a Gradle project. Theoretically you could use this to modify the code and recompile an APK with VSCode, but it is extremely difficult to get it right.
Alternatively, there is a tool called dexpatcher that allows you to patch an APK by writing Java code. Unfortunately the tool is really not user friendly, the documentation is poor and not designed to help people to learn, so I would not recommend it.
Finally there is one tool good enough for beginners: APKLab, a VS Code extension allowing you to:
- Decode the resources from an APK
- Disassemble the APK to Smali
- Patch the Smali
- Rebuild the APK and sign it seamlessly
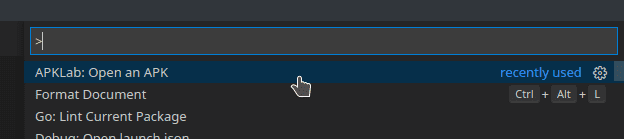
So if you haven't got it on your system already, install VSCode or its counterpart free of telemetry: VSCodium and install the extension APKLab.
Then press CTRL + SHIFT + P to open the command search and look for APKLab.
Select "APKLab: Open an APK" and then select the "kgb-messenger.apk" file.
APKLab relies on apktool and jadx under the hood. When you have selected your apk file, you can edit some configuration:
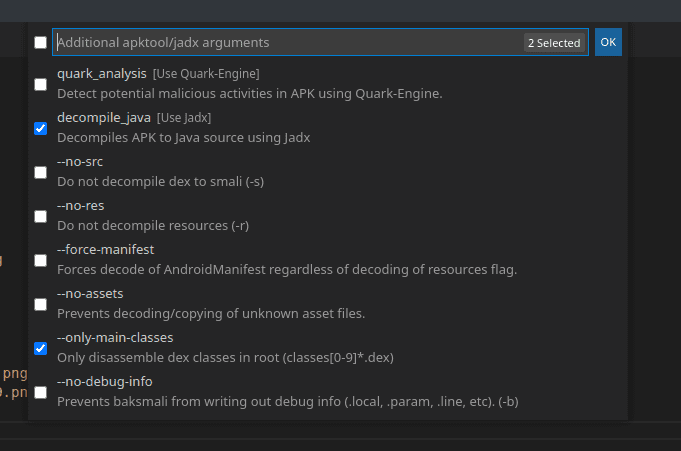
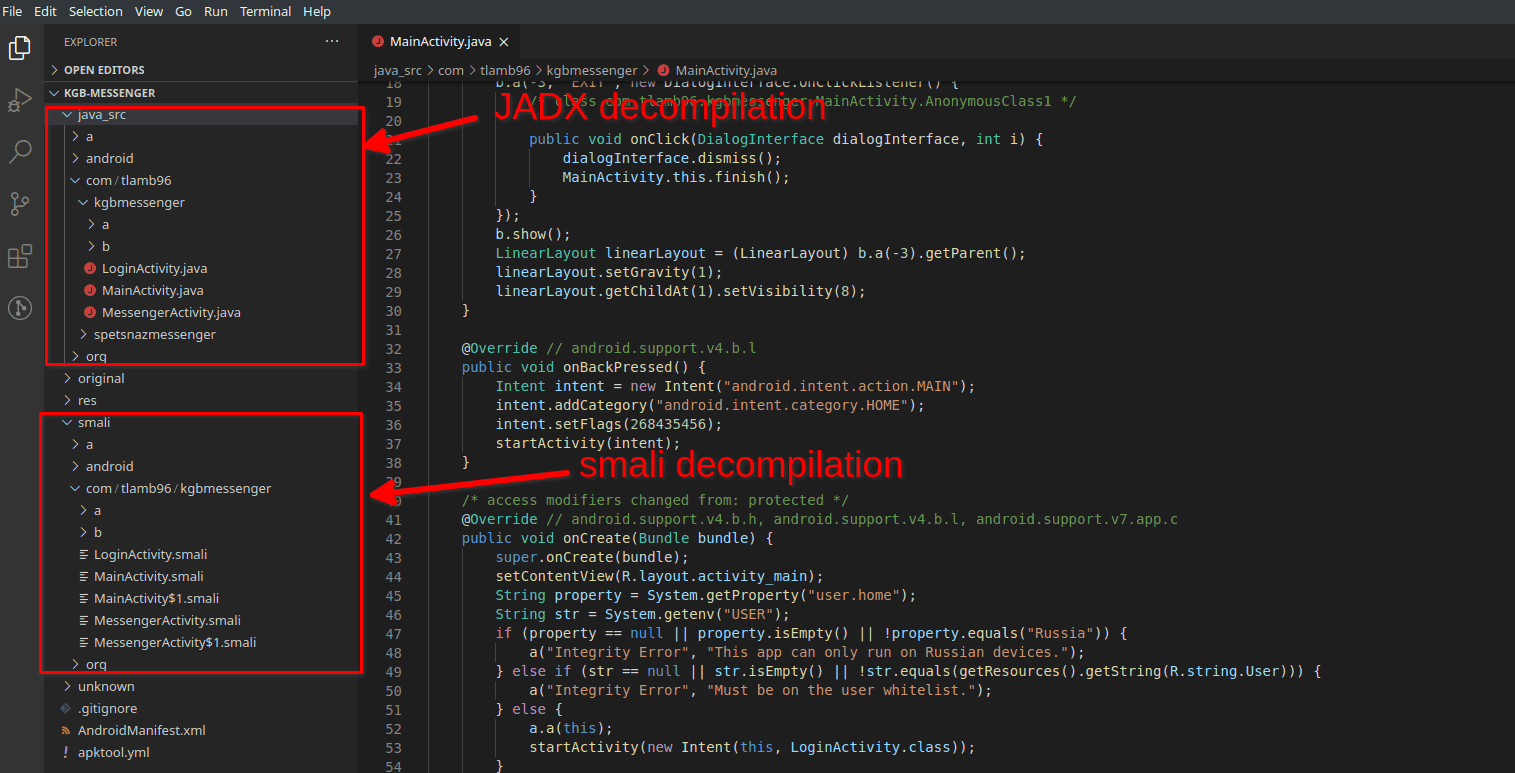
Once you click "OK", the tool will decompile the apk and create a new project with the same name as the apk. A new VS Code window should open automatically. In the project you will see two main folders:
- java_src: contains the JADX decompilation readable as Java source code.
- smali: contains the smali decompilation (more on this right after).
smali and dex
smali is an assembler/disassembler for the dex format. To understand what smali and dex are, we have to quickly go back to the build process of an Android application.
When you develop your Android app, you are programming in java and produce .java files. When you compile your app to an apk, these .java files are compiled to .class files which are in turn compiled to .dex files.
dex stands for Dalvik Executable. It is a bytecode format optimized for Android that can be run by the Dalvik VM, or its successor: the Android Runtime (ART).
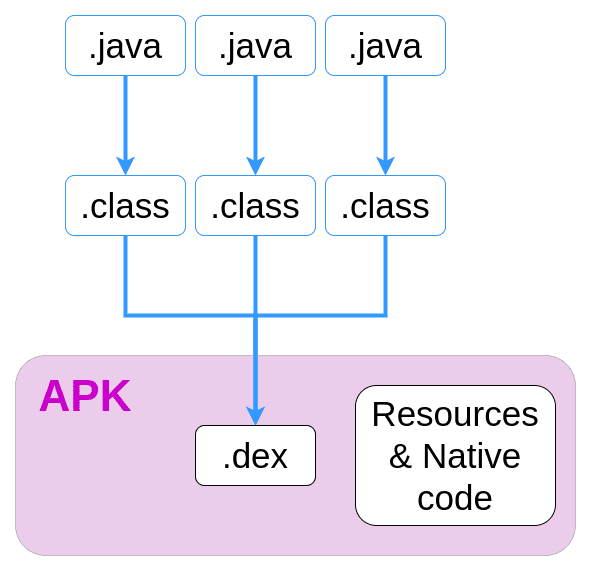
smali is a kind of assembly language for .dex files. Here is what it looks like:
.method protected onCreate(Landroid/os/Bundle;)V
    .locals 3
    invoke-super {p0, p1}, Landroid/support/v7/app/c;->onCreate(Landroid/os/Bundle;)V
    const v0, 0x7f09001c
    invoke-virtual {p0, v0}, Lcom/tlamb96/kgbmessenger/MainActivity;->setContentView(I)V
    const-string v0, "user.home"
I didn't go into too much details about this because, first off, I am not an expert on the build process, and second, there are entire articles describing this better than I ever will.
Patching smali
Since smali lets us manipulate dex files, we can modify smali files and recreate an apk with the modified smali.
In VS Code we select the file MainActivity.smali in the directory smali.
At line 132 we can see the message we were getting when opening the application:
const-string v0, "Integrity Error"Let's change it by something else:
const-string v0, "I patched this!"Now right click on the file apktool.yml in the left panel and select Rebuild
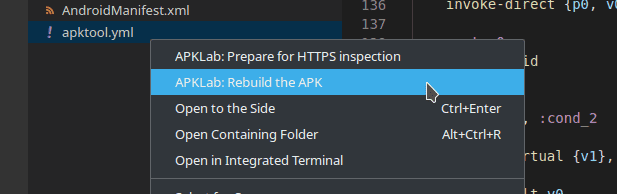
This will create a new apk file in /dist.
Uninstall the application on your phone, install the newly patched apk and start it. You will see that the title of the dialogue was modified with your text!
Skipping the alert
Let's get back to our challenge. If you remember well, the code was looking for the property user.home and if some conditions weren't met, the error message was displayed:
String property = System.getProperty("user.home");
String str = System.getenv("USER");
if (property == null || property.isEmpty() || !property.equals("Russia")) {
    a("Integrity Error", "This app can only run on Russian devices.");
} else if (str == null || str.isEmpty() || !str.equals(getResources().getString(R.string.User))) {
    a("Integrity Error", "Must be on the user whitelist.");
} else {
    a.a(this);
    startActivity(new Intent(this, LoginActivity.class));
}
Here we can see that what we want to get to is the activation of the LoginActivity. We don't really care about all the control checks before and we want to delete them.
The smali code responsible for launching the LoginActivity is this one:
invoke-static {p0}, La/a/a/a/a;->a(Landroid/content/Context;)V

new-instance v0, Landroid/content/Intent;

const-class v1, Lcom/tlamb96/kgbmessenger/LoginActivity;

invoke-direct {v0, p0, v1}, Landroid/content/Intent;-><init>(Landroid/content/Context;Ljava/lang/Class;)V

invoke-virtual {p0, v0}, Lcom/tlamb96/kgbmessenger/MainActivity;->startActivity(Landroid/content/Intent;)V
So we just have to find a way to run this code to solve the challenge.
You could copy this code between :cond_0 at line 131 and :goto_0 at line 138. That way, instead of displaying the alert when the control check fails, I actually start the LoginActivity.
On my part I deleted every unnecessary line and recompiled the apk:
.method protected onCreate(Landroid/os/Bundle;)V
    .locals 3

    invoke-super {p0, p1}, Landroid/support/v7/app/c;->onCreate(Landroid/os/Bundle;)V

    const v0, 0x7f09001c

    invoke-virtual {p0, v0}, Lcom/tlamb96/kgbmessenger/MainActivity;->setContentView(I)V

    invoke-static {p0}, La/a/a/a/a;->a(Landroid/content/Context;)V

    new-instance v0, Landroid/content/Intent;

    const-class v1, Lcom/tlamb96/kgbmessenger/LoginActivity;

    invoke-direct {v0, p0, v1}, Landroid/content/Intent;-><init>(Landroid/content/Context;Ljava/lang/Class;)V

    invoke-virtual {p0, v0}, Lcom/tlamb96/kgbmessenger/MainActivity;->startActivity(Landroid/content/Intent;)V

    return-void
.end method
Once I rebuilt the APK and installed it, I was greeted with a login page:
Patching with APKTool
APKLab is great since it automates everything for us. But you might want to know how this tool works. APKLab is built on three important and widely used tools:
- apktool: an utility for reversing binary Android apps. It is capable of disassembling the apk and can rebuild the decoded resources back to a new apk.
- keytool and jarsigner: standard programs that ships with the Java Development Kit used to sign Android applications.
We've already seen what disassembling is and how it works, so I won't go into too much details about apktool apart from showing you how to use it. On the other hand we've never addressed the topic of application signing.
Android application signing
All Android applications must be signed. The resources linked to the signature can be found in META-INF. You might have seen this folder when we decompiled the application with JADX. Here is how the signature process works:
- The
MANIFEST.MFcontains the hash of every file. In particular theclasses.dexandAndroidManifest.xmlfiles. - Every hash is signed with our private key and the signatures are stored in the
CERT.SF. - The
CERT.RSAfile contains our public key that people will use to verify the signatures.
Now, the thing is, there is no PKI in the Android ecosystem. The people who provide the APK are also the one who provide the means to verify its integrity. In this instance, I want to modify an APK and distribute it, and I am entirely capable of doing this: I just need to sign the hashes with my private key. This is what the keytool and jarsigner utilities are used for.
Here is the official documentation on apk signing if you're interested.
Decompiling with apktool
I won't go into details about the apktool installation process as it is properly documented. Here is how you can use it to generate the decompiled files from an apk:
apktool d kgb-messenger.apk
I: Using Apktool 2.4.0 on kgb-messenger.apk
I: Loading resource table...
I: Decoding AndroidManifest.xml with resources...
This command creates a new directory named kgb-messenger. If you open it, you will see that it is identical to the one created with APKLab except for the fact that the java source files are missing.
Here you can modify the MainActivity.smali file in exactly the same way you did before.
Recompiling with apktool
Now that you have written your patch, you need to produce a new apk file. To do so, we point apktool to the folder it created before (containing our modifications):
apktool b kgb-messenger
I: Using Apktool 2.4.0
I: Checking whether sources has changed...
I: Smaling smali folder into classes.dex...
The built apk will be in kgb-messenger/dist.
Signing the apk with keytool and jarsigner
Finally we need to sign the newly created apk for it to be valid. First we generate the keys we will use to sign the apk:
keytool -genkey -alias keys -keystore keys -keyalg RSA -keysize 2048 -validity 10000This command will ask you for a password and its confirmation and personal information (which you can leave empty). It ends by asking you to confirm everything by entering yes.
Then we can use the newly generated keys to sign our apk:
jarsigner -verbose -keystore keys kgb-messenger.apk keysThis is it! You can now install this new apk and solve the first challenge.
Conclusion
What we did in this tutorial was static analysis. In this case it was rather easy since the application is simple and not obfuscated. Sometimes the application is too complex to perform a static analysis like this. This is where dynamic analysis shines. If you'd like to learn more about dynamic analysis tools I wrote an article on Frida, you will also be interested in Dexcalibur, a tool designed to accelerate your dynamic analysis.