Backup all the things with restic
This article is the first of a four part series describing my current backup system:
- In this article I explain how I use restic to perform my backups.
- In the second article I describe the setup I use to verify that the backups run periodically.
- In the third article I show how I automate the backups, in particular when I need to read files with special permissions.
- Finally in the last article I detail the process I had to follow to backup a remote server to a machine on my home local network.
Restic is a backup utility written in Go with four major advantages:
- it is simple to use
- it supports encrypted backups
- it is compatible with many storage solutions (B2, S3, Minio, Google, Azure, ...)
- you can mount backups and snapshots to explore them and retrieve a single file
Use cases
Before diving into the specifics of how restic works and how to configure it, let me introduce you to some key elements of the architecture I need to backup.
There are four main devices I need to backup:
- my NUC: it runs my homelab services as docker containers. None of this is exposed online.
- my web server: it runs my exposed services as docker containers.
- my desktop: I just want to backup some folders and some KDE configuration.
- my NAS: it stores pretty much everything on my network but I will backup some folders only.
Along these, there are two devices I plan to use to store my backups:
- my NAS: I want to have a local backup available. I also plan to periodically copy this backup on another external storage not connected to my network to be able to withstand cryptolockers.
- my backup server: an online server whose main purpose is storing my backups to be able to withstand natural disasters or burglaries.
Preparing the backups
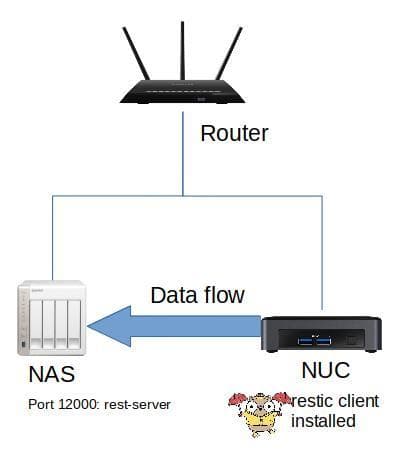
The initial setup requires us to install restic on the device we want to backup and rest-server on the device that will store the backups. I will demonstrate how to do this with the use case NUC to NAS where I backup the NUC data to my NAS.
Install restic
Installing the restic client on a Linux machine is fairly easy. In my case, my NUC runs Ubuntu server and I can install restic with a simple command.
sudo apt-get install resticCheck out the installation doc to see how to install restic for your use case.
Install REST server
Restic is able to backup to a local storage (another folder or a mounted USB), to Amazon S3, Minio Server, Backblaze B2, Azure, Google Cloud Storage, SFTP, etc. While the number of compatible solutions is impressive, I don't want to learn how Minio, B2, or GCS works to set up my backup solution.
That's why I chose to use restic's own solution: rest-server:
Rest Server is a high performance HTTP server that implements restic's REST backend API. It provides secure and efficient way to backup data remotely, using restic backup client via the rest: URL.
It is simple to use and compatible with restic out the box. You can run it in a docker container to simplify its usage.
docker run -p 8000:8000 -v /my/data:/data --name rest_server restic/rest-serverQNAP NAS
For my part, I have a QNAP NAS which has a terrible OS, so I had to download the qpkg package and install it. On the NAS, I modified the file /opt/ResticServer/ResticServer.sh to start the restic server with my preferred options. Since my backup folder is named Backup, I replaced every instance of RestBackup (the orignal named configured in the script) to Backup.
Init the repo
I installed restic on the NUC and rest-server on the NAS. The rest-server is accessible throught the port 12000 and is configured to store everything in a folder called Backup on my NAS. Let me throw in a picture to let you rest for a bit:
Now let's say I want to create a repository called NUC. The command to use is:
restic -r rest:http://my-nas:12000/NUC initRestic will ask to initialize a password and confirm it. And now I have a new folder Backup/NUC which stores the restic repository.
I can use the check command to verify that a repository exists and has no errors:
restic -r rest:http://my-nas:12000/NUC check
enter password for repository:
password is correct
create exclusive lock for repository
load indexes
check all packs
check snapshots, trees and blobs
no errors were found
Backup
Backing up with restic is pretty easy. I use the backup command while pointing at the repo where I want to store my backup. If I wish to backup the folder ~/work the command would be:
restic -r rest:http://my-nas:12000/NUC backup ~/workIt is that simple.
Of course there are other options: I can exclude or include files, I can backup data read directly from stdin (from a mysqldump for instance), I can tag my backups. The documentation is well written, there is no point in repeating it here.
If you need to backup a complete system you don't have to run restic as root to do so. The process is explained here. TL;DR: use setcap cap_dac_read_search on the restic binary.
Everytime a backup is performed, restic creates a snapshot. To list the snapshots, I use the command snapshots:
restic -r rest:http://my-nas:12000/NUC snapshots
enter password for repository:
password is correct
ID        Date                 Host        Tags        Directory
----------------------------------------------------------------------
ac8721ec  2020-06-01 20:18:16  my-desktop              /home/myuser/Web
----------------------------------------------------------------------
1 snapshots
I can then use the ID of the snapshots to perform other actions.
Restore
Backing up is great, but it serves no purpose if you can't restore your backups.
To restore a backup, you first need to choose which snapshot you want to restore.
For instance the ID of the snapshot I want to restore is ac8721ec.
The command to restore it in the directory /tmp/restore-web is:
restic -r rest:http://my-nas:12000/NUC restore ac8721ec --target /tmp/restore-webUse latest to reference the last snapshot id.
restic provides other useful options such as --exclude and --include to restrict the restore to a subset of files.
But the most useful feature of restic must be the mount capability. With mount you can browse a backup like a regular file system. This is done thanks to the fuse kernel module. The following command mounts the backup with every snapshot in /mnt/restic:
restic -r rest:http://my-nas:12000/NUC mount /mnt/resticAnother useful command is dump. It allows you to print the contents of a file to stdout:
restic -r rest:http://my-nas:12000/NUC dump latest --path /home/myuser/Web/db/users.sql > ~/users-restore.sqlOther useful commands
Changing the password
If you ever need to change your password, you can use the following command:
restic -r rest:http://my-nas:12000/NUC key passwdAdding a password
You can add a password with:
restic -r rest:http://my-nas:12000/NUC key addYou can also list keys with key list and remove them with key remove.
Deleting snapshots
We have already seen how to list snapshots.
You can use the forget command to prune a snapshot by referencing it by its ID:
restic -r rest:http://my-nas:12000/NUC forget bdbd3439Automation
I went through the basics of how to use restic. Now that this is done I can use this knowledge to create an automated backup workflow.
The idea is to create cron job running a shell script using the restic backup commands seen earlier.
You can keep reading this series with part 2 : A backup monitoring system.